
Installing Electric Underfloor Heating Yourself (Guide)
Installing electric underfloor heating yourself is perfectly achievable, even if you don't work in construction. With the right preparation, a few hours of your time, and the proper materials, you'll soon have a floor that feels comfortably warm throughout the winter. In this guide, we'll walk you through the entire process step by step—from measuring the room and laying the heating mat to applying self-leveling compound and connecting the thermostat. Watch the video for a visual overview, or read the full instructions below and get started right away.
What Do You Need?
Before you start, make sure you have everything ready. There’s nothing more frustrating than having to make an extra trip to the hardware store halfway through the job.
Tools
-
Multimeter (essential—you’ll use this later)
-
Mixer for self-leveling compound
-
Trowel or smoothing float
-
Scissors or utility knife
Materials
-
Electric underfloor heating mat
-
Floor temperature sensor
-
Electrical conduit
-
Flush-mounted thermostat box
-
Primer
-
Self-leveling compound
-
Silicone sealant
Protective Equipment
-
Dust mask (when mixing mortar)
-
Safety glasses
-
Hearing protection
-
Soft-soled shoes while laying the mat
IMPORTANT: Safety First
When installing electric underfloor heating, you are working with electricity. That requires a bit of common sense. Always switch off the power before carrying out any electrical work—no exceptions.
Wear a dust mask when mixing self-leveling compound, as the dust particles are finer than they appear. And while laying the heating mat, avoid stepping directly on the cables. Wear soft-soled shoes to prevent damaging or pressing down the wires.
Step 1: Measure the Area and Calculate Materials
A good calculation prevents costly mistakes. Measure the room and subtract any areas that do not require heating, such as the space beneath a shower, bathtub, or fixed cabinetry. These areas do not need to be heated.
Based on the net heated floor area, calculate how much heating mat you need. Pay close attention to the product specifications, including:
-
Wattage per square meter
-
Mat width
-
Recommended spacing between heating cables
Buy neither too much nor too little. Heating mats cannot be shortened without damaging the heating cable, while too little matting will leave parts of the floor cold.
Carefully review the product specifications before ordering.
Next, measure the resistance of the heating mat with a multimeter and record the value. You will need this later as proof that the mat was undamaged before installation. This is important for warranty claims.
Step 2: Prepare the Power Supply and Thermostat
The thermostat requires a power supply. Check whether power is already available at the intended installation location. In bathrooms, this is not always the case.
Cut a channel in the wall from the flush-mounted box down to the floor. An electrical conduit will run through this channel and contain two cables:
-
Power cable
-
Sensor cable
Both cables will later be routed from the floor up to the thermostat.
Install the flush-mounted box at the desired height. Make sure the conduit is long enough—slightly too long is better than too short.
[products=handleiding_stap_2]
Step 3: Lay the Underfloor Heating Mat
This is the most critical step. A damaged heating cable cannot be repaired, and you may not discover the issue until the entire floor has been finished.
Ensure the subfloor is level, clean, and dust-free. Apply primer to the floor and allow it to absorb properly.
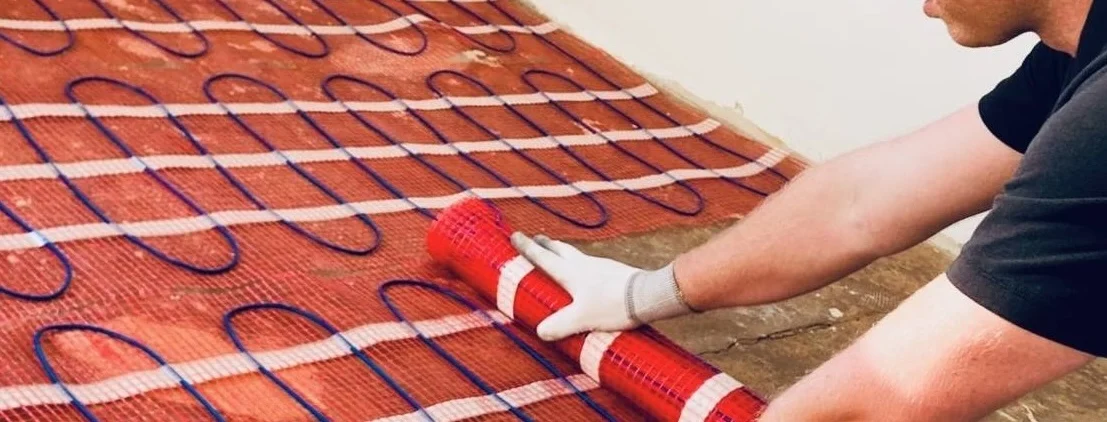
Next, roll out the heating mat.
You may cut the mesh backing to create turns or work around obstacles, but never cut the heating cable itself.
Arrange the cables neatly and secure them at several points with tape or adhesive so they remain in position during leveling.
Now measure the resistance again using your multimeter. Check whether the value matches the original measurement.
If the reading differs significantly, the cable may have been damaged. Record the new value.
Position the temperature sensor midway between two heating cables without touching either cable. Route the sensor cable through the conduit to the thermostat box.
Tip
Think ahead about future installations.
Planning to install a shower screen later? Consider the exact positions of the mounting points now. Drilling through a heating cable after installation can cause serious problems.
[products=blog_soorten]
Step 4: Mix the Self-Leveling Compound
Self-leveling compound completely covers the heating mat and ensures even heat distribution.
Choose a compound that is suitable for use with underfloor heating systems.
First, seal any holes and gaps in the floor using silicone sealant and allow it to cure.
Then calculate the amount of leveling compound required based on the floor area and desired layer thickness.
Mix the compound with an electric mixer until you achieve a smooth, lump-free consistency, following the manufacturer's instructions exactly.
Prepare slightly more than you think you'll need. Two separate batches do not blend perfectly if you have to mix additional material midway through the job.
Clean your mixer and tools immediately with water. Hardened leveling compound is much more difficult to remove.
[products=handleiding_egaline]
Step 5: Level the Floor (Choose One of Two Methods)
At this stage, you have two options. Choose the method that best suits your final floor finish.
Option 1: Embed the Heating Mat in Tile Adhesive
If you're installing tiles, you can incorporate the heating mat directly into the tile adhesive.
Apply the adhesive using a notched trowel and press the mat firmly into it. Then install the tiles over the heating mat.
Ensure that:
-
The mat is completely covered.
-
The mat does not shift during tiling.
Tip
We usually apply a layer of tile adhesive to the floor first. Then we press the mat upside down into the adhesive with the cable facing downward. After that, we apply another layer of adhesive over the mat before laying the tiles.
Option 2: Use Self-Leveling Compound (e.g. for Glue-Down PVC Flooring)
Start in a fixed corner of the room and work toward the doorway so you don't walk over the freshly leveled surface.
Pour the self-leveling compound and spread it evenly using a trowel.
Maintain the correct layer thickness:
-
The heating cable should sit just beneath the surface of the leveling layer.
-
The cable should not be embedded too deeply or remain exposed.
Check periodically to ensure the mat stays in place.
Both methods are suitable—the right choice depends on the type of floor covering you plan to install.
After Installation: Connect and Test the Thermostat
Install the thermostat in the flush-mounted box.
Connect:
-
The power supply cable
-
The heating cable
-
The sensor cable
Use the thermostat manual to verify the correct wiring configuration.
Switch the power back on and test the system.
If the floor starts warming up, everything is working correctly.
Important for Tiled Floors
Wait at least 28 days before turning on the underfloor heating if you have installed tiles.
The tile adhesive and grout require this time to cure fully. Turning on the heating too early increases the risk of loose or cracked tiles.
Installing PVC Flooring?
Lightly sand the leveling layer before installing the PVC floor. This improves adhesion and helps achieve a better final result.
Frequently Asked Questions About Installing Electric Underfloor Heating
Can I Install Electric Underfloor Heating Myself?
Yes. Installing the heating mat itself is a DIY-friendly task.
However, the final electrical connection to the circuit should preferably be carried out by a qualified electrician, especially if no dedicated circuit is already available.
How Do I Know How Much Heating Mat I Need?
Measure the net floor area:
Total floor area – areas beneath showers, bathtubs, and fixed cabinets.
Purchase enough matting to cover only the heated area.
Why Do I Need to Measure the Resistance?
The resistance value confirms whether the heating mat is undamaged.
By recording the resistance before, during, and after installation, you create evidence for any future warranty claim.
It is also the quickest way to detect installation damage.
How Long Should I Wait Before Turning on the Heating?
For tiled floors, wait at least 28 days.
For other floor finishes, follow the drying time specified for the self-leveling compound. Always consult the product packaging for exact curing times.
What If the Resistance Changes After Installation?
Stop immediately and locate the damage before proceeding with leveling.
Once the cable is covered with mortar or leveling compound, repairing a damaged section becomes extremely difficult.
Ready to Get Started?
Now that you understand the installation process, you can confidently choose the right materials for your project.
Browse our range of electric underfloor heating mats and select the option that best suits your room and floor type.
Still unsure? We'd be happy to help you calculate the correct quantity. Feel free to contact us for advice.


